

ENGAGED™The end-to-enddemo methodology
ENGAGED™ gives your team a repeatable structure, from preparation to follow-up. It helps everyone know what to do, when to do it, and when to involve each other, so your whole sales team works with the same process and speaks the same language.

ENGAGED™: 7-step demo process for maximum success
At the core of the methodology is the ENGAGED™ process. It gives every seller and solution engineer a repeatable, easy-to-follow structure. It makes sure every demo is prepped internally, helps you establish context and engage your audience, and gets your customer to commit to the next steps.
Yes, it spells a word. No, that was not an accident.
ResultObjective and message set
ResultA conversation driven by the customer's problems, questions and concerns
ResultNext step confirmed
Establish the objective
Be clear on what you want the customer to do next.
Free tool: Demo preparation checklistBefore the demo, you and your AE agree what the customer should do afterwards. You also agree on the one message the customer should remember and repeat to their colleagues.
At the start of the call, you recap what you learned about the customer. Everyone hears again why they are here and which problems the demo will solve.
Grab attention
Start with the end result so they quickly see what matters.
Free tool: Storytelling for software demosYou open with the customer's number one priority and show the solution to it right away. You skip the long story of how the problem comes about.
You show the big picture and keep the demo at a high level. You show how easy the product is to use, and you do not configure every detail live.
The demo turns into a conversation. The customer asks questions and you answer them, so the customer decides how deep you go.
Encourage objections
Bring hidden concerns to the surface early.
Free tool: Objection handling cheat sheetWhen it feels like the customer has already bought, you ask a few uncomfortable questions on purpose. You ask for negative feedback now, before it shows up later.
Determine next steps
Recap the value and get a go or no-go decision.
Free tool: Demo entry and exit criteriaYou plan the concrete next step together with the customer. Ideally, it is the step you agreed on before the demo, so every demo ends with a next step.
Before the demo: the preparation checklist
You fill it in together with your AE before every demo. Above all, it makes sure every demo has a clear purpose and objective that helps move the opportunity forward. It puts the first two ENGAGED™ habits, Establish the objective and Name the why, on paper.
Get the free checklist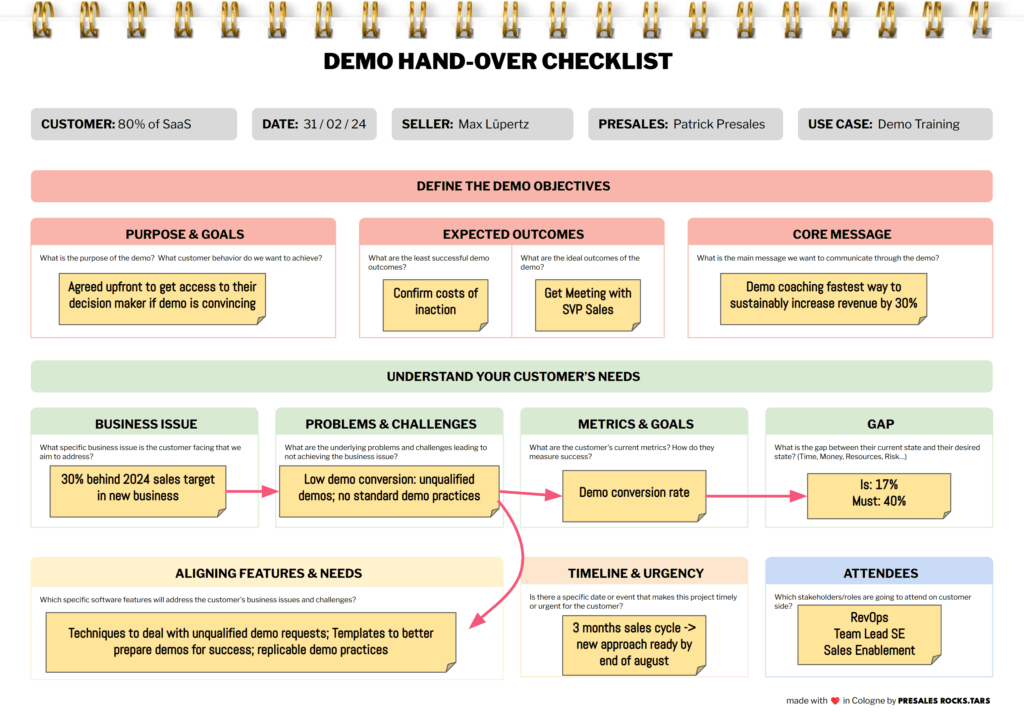
Fill this in with your AE. Before the call, not on the call.
Define the demo objectives
- Purpose and goalsWhat is the primary purpose of the demo?What specific behavior or reaction do we want to achieve from the customer?
- Expected outcomesWhat is the least successful outcome that we would still consider acceptable?What would be the ideal outcome or best-case scenario for the demo?
- Key theme and main messageWhat is the main message or theme we want to communicate through the demo?
Understand your customer's needs
- Business issuesWhat specific business issue is the customer facing that we aim to address?
- Problems and challengesWhat are the underlying problems and challenges behind this business issue?Why have these problems not been fixed yet, and what impact do they have on the business?
- Customer metrics and goalsWhat are the customer's current metrics?What is the gap between their current state and their desired state?
- Timeliness and urgencyIs there a specific date or event that makes this project timely or urgent for the customer?
Align features and needs
- Solution alignmentWhich specific software features will address the customer's business issues and challenges?
The 3Rs: what belongs inside every part of the demo
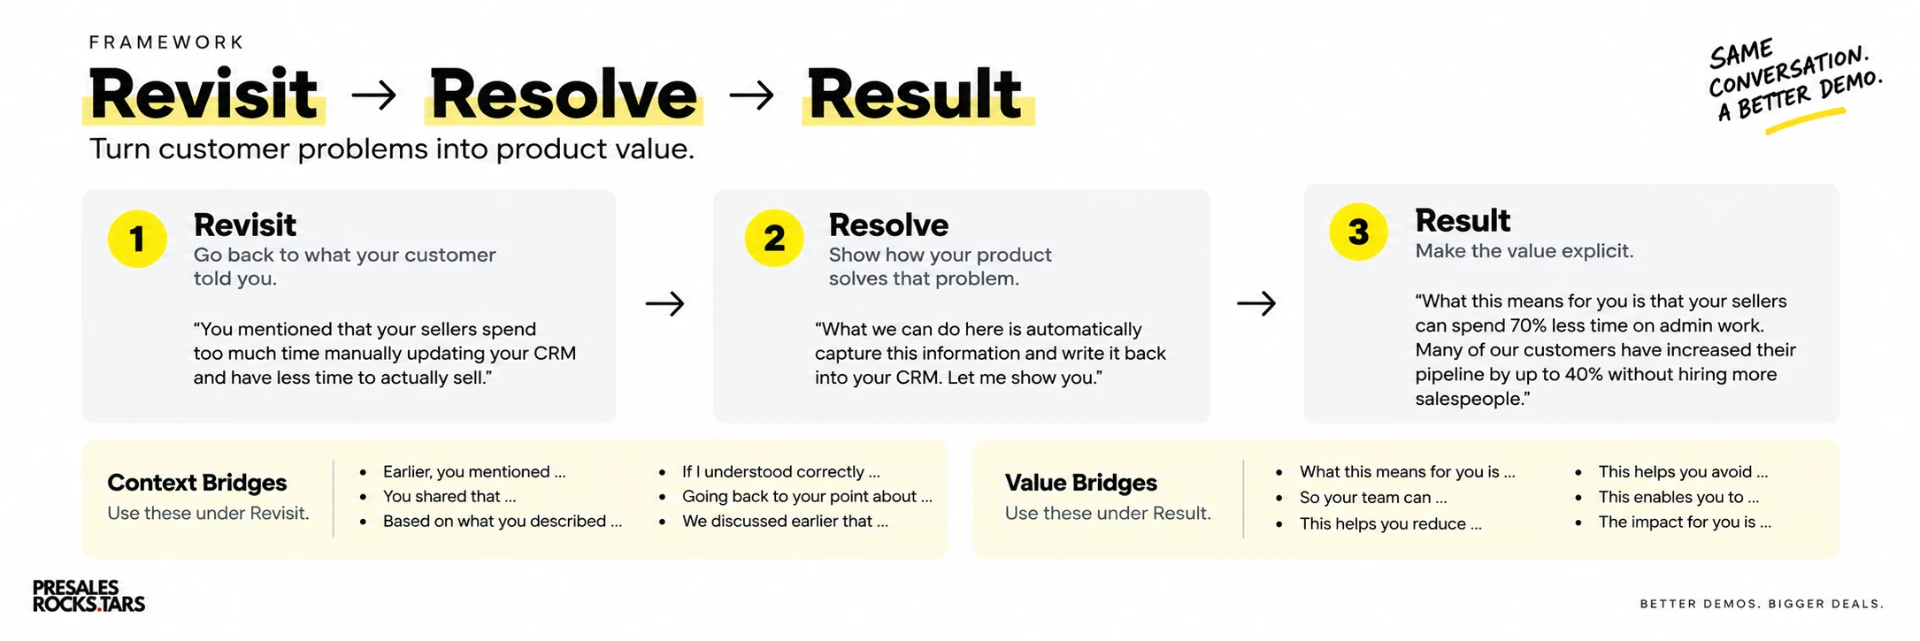
Use the same three steps for every part of the demo. They tie what you show back to what the customer told you.
Say the Result out loud. Your customer will not do the math for you.
Revisit
Remind the customer of something they told you earlier, before you show anything.
“You mentioned earlier that reporting takes too long each month.”
Resolve
Show only the part of the product that solves that exact problem.
“This dashboard automates the manual data collection and removes the spreadsheet work.”
Result
Say out loud what this means for the customer, so they do not have to work it out.
“That means your HR team can prepare reports faster and spend less time on admin.”
Same feature, two ways
A reporting dashboard in the demo. Switch between the two structures.
- TellNow I will show you our reporting dashboard.
- Show(clicks through the filters, the regions and the export button)
- TellSo that was our reporting dashboard, with filters and export.
A tidy shape. But the customer still has to work out why any of it matters.
Entry and exit criteria: which demos should you run?
Most SE teams are busy because they demo too often and too early. Written rules protect your calendar and make every demo count. These are examples of what the rules can look like.
It is okay to say no to a demo. Really.
- Discovery
- Entry gateShould this demo happen?
- The demo
- Exit gateDid the demo do its job?
- Next stage
Entry criteria
Should this demo happen?
- The customer's problem is confirmed in discovery.
- You know who will attend the demo and who decides.
- You and your AE agreed what the demo should achieve.
- The next step after the demo is already discussed.
Exit criteria
Did the demo do its job?
- The customer confirmed that the problem you showed is real for them.
- The customer told you what they think of the solution: go or no-go.
- A next step is agreed and already in the calendar.
- You and your AE looked at what worked and what did not.
Want a ready-made set for your team? Download the free criteria.
Want your whole team to use it?
Reading a methodology is the easy part. In my programs, I teach it with your own demos, so your SEs and sales team use the same playbook every day. ENGAGED™ builds on ideas from Great Demo!, which I also teach as a certified coach.